Remote Updates (OTA)
- Ricardo Rufino
OTA (Over the Air) update is the process of loading a new firmware to ESP8266 module using WiFi connection rather than a serial communication. This type of functionality is extremely useful in case of no physical access to the ESP module.
Hardware Setup
Add Includes to Skecth to enable OTA
#include <ESP8266WiFi.h>
#include <ArduinoOTA.h>  // Enable Remote Updates
You can se full featured OTA Sample:
On IDE: File > Examples > OpenDevice > Projects > SonoffBasic
The first upload must be done by the Serial, the others can be done by the network.
Upload ( Using Middleware / Server )
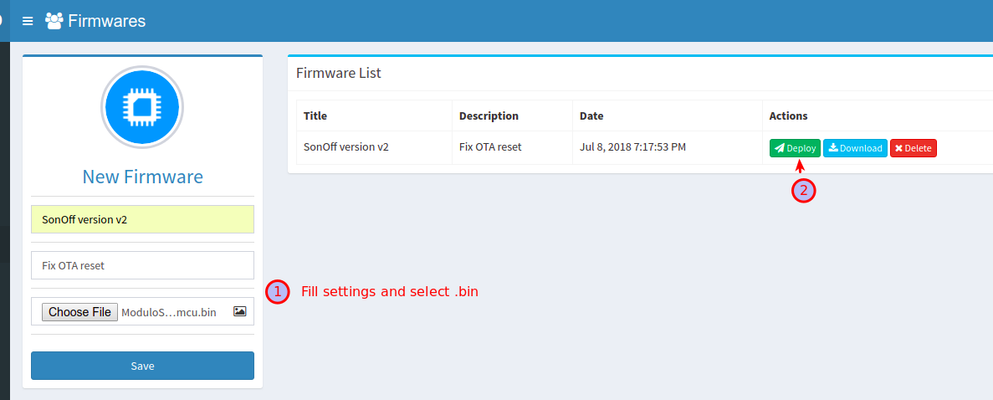
The OpenDevice Server has Firmware version management functionality (binaries only for now)
Through the Programming Menu, it is possible to remotely send firmware to devices
Steps:
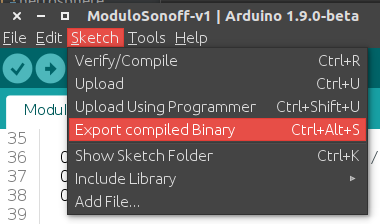
1. Generate .bin file: The file will be saved in sketch folder
2. Upload firmware binary in Menu > Programming
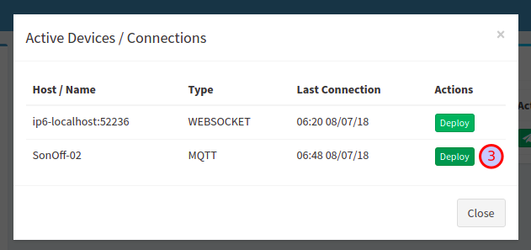
3. Select active connection
We still do not have any feedback if the update worked out right or wrong.
See: https://github.com/OpenDevice/OpenDevice/issues/138
You can enable DEBUG_PORT and DEBUG_LEVEL = HTTP_UPDATE in ESP Configuration Menu on Arduino IDE, to troubleshoot problems
Upload ( Using IDE )
Enable SoftAP: WiFi.mode(WIFI_AP_STA);
On serial console you can see the IP:

Only if module is connected to network, after a couple of seconds, the esp8266-ota port will show up in Arduino IDE.
On linux, you can scan
avahi-browse -rt _arduino._tcp
If it does not appear in the list, restart the IDE.

The password is same API_KEY
If it still does not appear, you can use the option: Upload ( Manual PUSH )
Upload ( Command Line )
This option uses the command line (terminal) to upload.
Goto esp8266 tools folder (Ex.: /home/user/.arduino15/packages/esp8266/hardware/esp8266/2.X.X/tools)
Run command (change IP, APY_KET and FILE)
python espota.py -i IP.IP.IP.IP -a "XXXXXXXX-XXXX-XXXX-XXXX-XXXXXXXXXXXX" -f /tmp/pathTo/Sketch.ino.bin
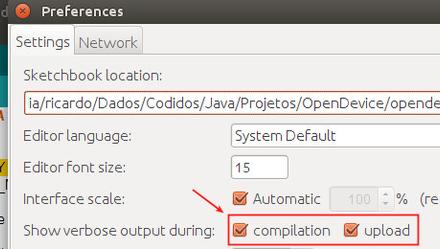
To find path to firmware you must enable verbose output in Arduino preferences:
Much information will appear, look for the file ending with ".ino.bin" on console