| Status | |
|---|---|
| colour | Yellow | title | DRAFT
| Table of Contents |
Introduction
...
- OpenDevice server up and running (guide)
- Arduino IDE (with required OpenDevice Libraries)
- ESP8266 module (like NodeMCU)
- DHT22/DHT11 sensor (and Adafruit's DHT22 library)
DHT22 | NodeMCU |
|---|
Wiring
The most basic DHT humidity and temperature sensor comes in two variants with different levels of accuracy.
| DHT-11 | DHT-22 | |
|---|---|---|
| Humidity range | 20%-80%RH (±5%RH) | 0%-100%RH (±2%RH) |
| Temperature range | 0-50°C (±2°C) | -40-80°C (±0.5°C) |
| Measurement time | 1s per sample | 2s per sample |
Setup
To program the NodeMCU, we are going to use Arduino's IDE. It's the easiest way to get up and running with the DHT22.
First, you'll have to set up your machine (Device Setup Instructions). These instructions take you through installing the IDE, ESP8266 and the required libraries.
In addition to this, you'll have to install DHT sensor library to read the sensor, we are going to use Adafruit's DHT22 library, and Adafruit Unified Sensor Driver
Install Adafruit's DHT22 library using Library Manager:
Next, install Adafruit Unified Sensor Driver
Code / Firmware
...
| Code Block | ||
|---|---|---|
| ||
#define DHTPIN            D2         // Pin which is connected to the DHT sensor.

// Available types:  DHT11, DHT22, DHT21
DHT_Unified dht(DHTPIN, DHT11);

DHT_Unified::Temperature sTemp = dht.temperature();
DHT_Unified::Humidity sHumidity = dht.humidity();

void setup() {
  Serial.begin(115200);

  ODev.name("ODevHT-01");
  ODev.apiKey("----APIKEY-----");
  ODev.server("----SERVER IP-----");

  dht.begin(); // Initialize device.

  ODev.addSensor("HT01_Temperature", new AdafruitSensor(sTemp))
    ->setInterval(12 * (1000)); // 1sec2sec

  ODev.addSensor("HT01_Humidity", new AdafruitSensor(sHumidity))
    ->setInterval(12 * (1000)); // 1sec2sec

  WiFi.mode(WIFI_AP_STA);
  WiFi.begin("---- WIFI----", "---- PASS----");

  ODev.begin();
}

void loop() {
  ODev.loop();
} |
...
You have the freedom to edit and position and enlarge the graph as you wish
TIP: In the dashboard you can use shortcuts like: F2 (edit), and: CTRL + S (save). And numeric shortcuts: 1..10, to change dashboard view
After organizing our charts, dragging and expanding, we get the result:
...
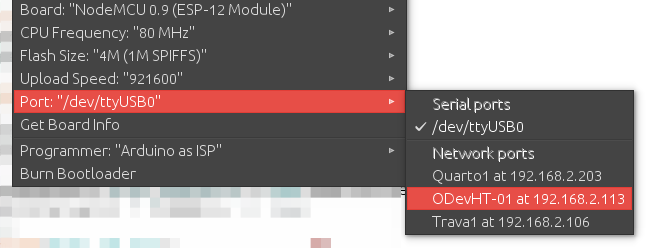
Now after the device is working and online, we can upgrade via OTA. In the Arduino IDE, the device should appear as if it were a Port:
Guide: Remote Updates (OTA)
WHAT'S NEXT?
At this point, you are collecting and visualizing data. But, what about reacting to it? The next step is to build a Rule(/wiki/spaces/DOC/pages/99352732) to send yourself a text message whenever the humidity gets too low. See examples
Examples:
https://github.com/OpenDevice/opendevice-lib-arduino/tree/master/examples
Recommended Resources:
- ESP8266 Troubleshooting Guide
- Getting Started Guide for the ESP8266 WiFi Module
- DHT11/DHT22 Humidity and Temperature Sensor With Arduino
...


